This product is an optional Wifi server for the K40 USB Lasersaur LaserShield and not a requirement for the LaserShield. However this server cannot be purposely utilized without a USB LaserShield attached, so if you haven't done that already please visit that product offering first. Lasersaur server is to be used in conjuction with the K40 Lasershield and provides remote control and access to your lasershield using your Wifi wireless network. It's backwards compatible with all our previous sold Lasershields so you don't have to even purchase this now if you'd rather try our Lasershield with a regular computer, or you can buy this to augment an older USB LaserShield that you'd rather use a low power remote embededed controller with Wifi support.
The advantages of using our USB to Wifi server controller sold as this product offering, mostly being that you can use your browser say in the office or house, while both controlling and viewing the LaserShield say in a wood shed outside or in machine shop or garage where the cutting fumes can be isolated from the office controlling environment. In addition a cheap and standard USB webcam can be plugged into one of the extra USB ports, and using another browser tab one can also watch the Laser remotely through the same LAN/ethernet.
Although an older PC can also be used through your network to remotely cut, the absolute low power enables this to always be powered on at low usage cost. As well as the integration and size being a small card like footprint. Wifi network and all Lasershield software already installed, along with a installer disk that will allow the Lasersaur browser software to be identically ran on a remote computer as if your PC was the controller itself. The seamless integration with cheap USB cameras (you provide) to one of the extra USB connectors makes remote viewing a snap! Just plug into our Lasershield run a quick remote desktop application to customize and you will now be able to cut with wireless power and ease.
In order to make this solution work you will need some computer and networking skills, though it is nearly plug and play for installation.
Installation and Eula Terms of Agreement:
Warning these lasers represent a danger to inexperienced technicians or people with no skills, we assume no liability for either your laser hardware or personel/employee risk. Miles-Milling is void of liability for incorrect installation of part and by installing this replacement laser controller the technician is acknowledging his duty and liability to follow all the instructions in this manual. Miles-Milling.com also does not warrant either the contoller nor the hardware that is adjoined to the replacement, nor do we assume any responsibility for usage or personnel or any other random people that may access it while running. Nor do we assume any risk for problems that may arise from being further away from the laser in case of emergencies, such as fires as one example. Buyer also acknowledges there are no safety interlocks on the hardware we provide to prevent access while running laser job, exposing risk to unsupervised children and/or unaware adults that may accidentilly get injured by access to laser system is liablity of buyer and user of this device solely. We strongly recommend that user configure safety interlocks be installed independent of the original K40 hardware, as well exinguishers be kept nearby laser cutting equipment.
For further disclaimers please read the Eula, installation means acceptance of the terms and conditions.
Installation of this product is unbelievably easy. First make sure your Laser is powered down before doing any installation, as hanging and swinging conductors of the USB connector can short out and damage your laser or controller!! We'll need access to the electronic compartment hatch of the K40 laser system. Before we add the server controller to the side vent holes.
Our first preliminary statement is that you should review all the steps of hardware assembly below, but before actually beginning installing standoffs, you must first configure your server to recognize your wifi network as well as program in the network key. We provide those steps later, but it makes more sense to not install the standoffs to K40 and instead plug in a short LAN cable and power supply to the server first and run a script or manually set the password for Wifi and username first. After configuring you will no longer need a LAN cable and it should connect automatically to your Wifi LAN. More on that later.
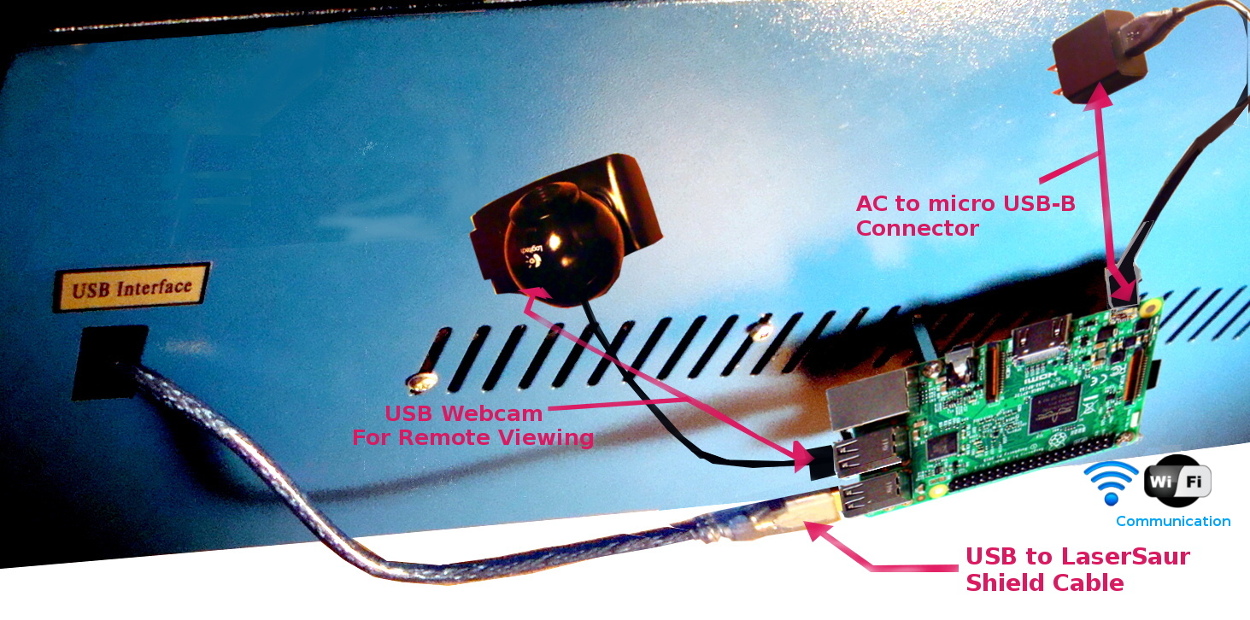
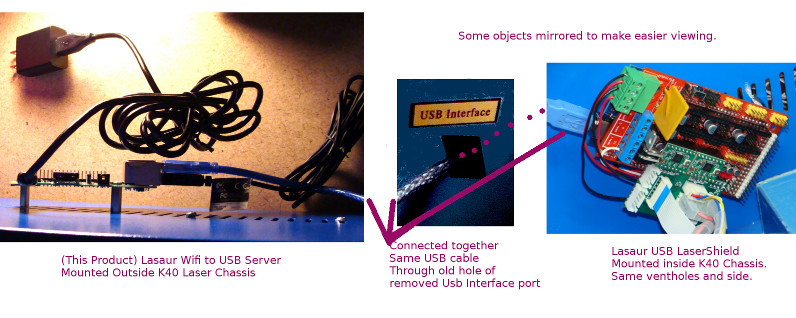
Please note that the USB to Wifi Server is to be mounted on the outside of the K40. This is because the Wifi Network can only be accessible from outside the metal box. The server is mounted using its preinstalled screws and standoffs to the outside of the K40 on the venting holes. The provided USB cable is looped around through the opening of the old USB Interface hole (image below), back into the connection of the USB Lasaur LaserShield port. This product defeats the need to have a computer controller at the site of the K40, and as it will allow us to control remotely the Lasersaur Shield as if we were on a local computer with USB connection. As you can see after connecting the USB cable to the LaserShield, you might want to also use another USB port for connecting standard USB webcam (optional) for remote viewing. In addition, you will then plug in power from a micro USB type B (same as most androids) to the power port as shown in picture below, to provide power to our embedded server. Please note: We do not provide USB webcams, nor AC to USB power supply, nor the USB to micro USB cable in this purchase. as all these can be obtained much cheaper at the dollar store and Walmart. |
|
 |
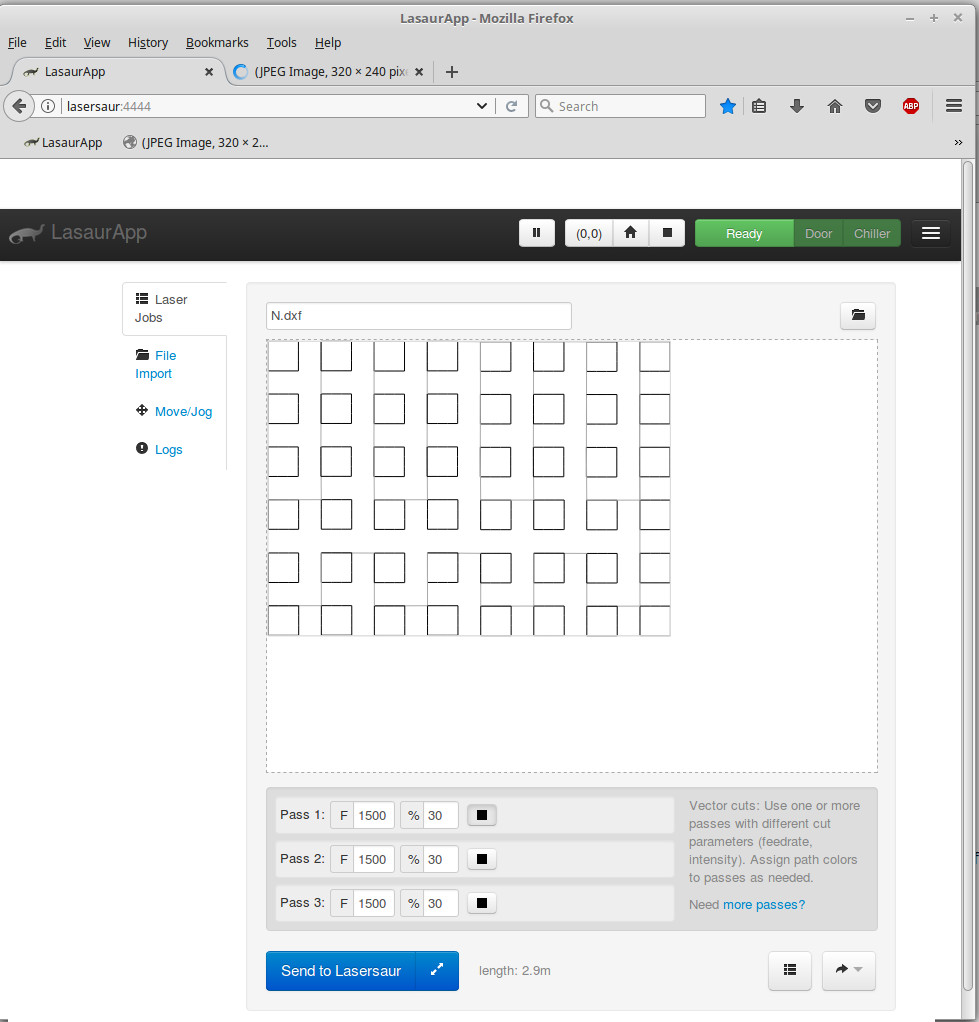
| Once our server is set up to your wifi network and physically mounted, you should be able to access using its hostname an ports using Firefox with any other computer on the same wireless network. We found only firefox and not chrome or explorer is compatible with the Lasaursaur so like this you'll need a new copy of firefox installed on your remote access computer. To bring up the Lasersaur control interface you will try in the URL location "lasersaur:4444" (without quotes). If all goes easy and your wifi router is set up to recognize device hostnames you will get the on the remote browser the Lasaurapp shown from webconent on our Lasaur server. If that doesn't work, you'll need to enter the proper 'IP address':4444, where you will obtain the exact IP address by using a discovery software on the PC to report all IP and detected devices on your network. Or another possibility if you need the ip address is to login into your router IP address and visit all the hostnames and IP addresses in the table of detected devices. Most likely simply putting lasersaur:4444 in the URL browser location should work if our server is powered on and connected to the same wifi network as your remote computer you are using. You might want to bookmark it to the lower toolbar as shown as well on your remote viewer/control of the Lasersaur as also shown below. That way you will always to bring up the Lasersaur application with one click after starting firefox.
|
|
 |
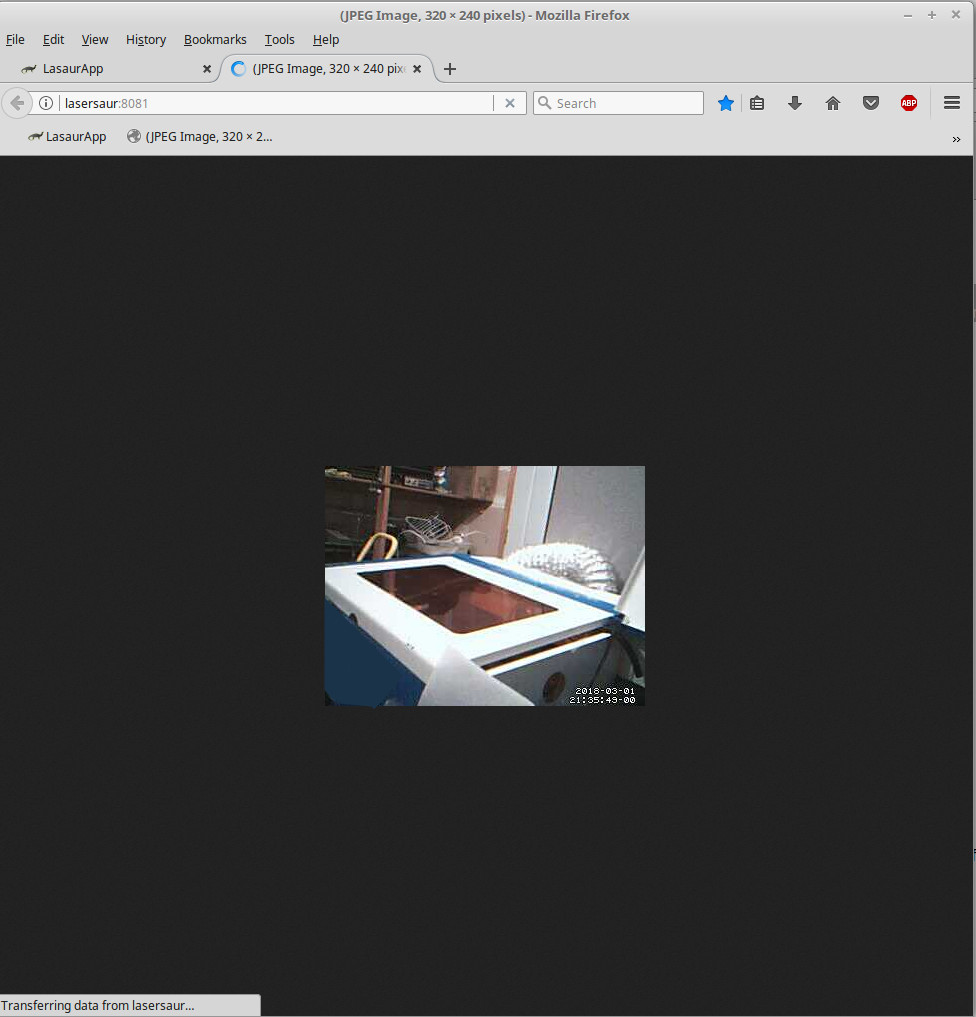
| If you have a usb camera attached to our Lasaur Wifi/LAN server you can also monitor your laser cutting remotely by opening another tab in the browser and again enter the lasersaur ip address with : 8081 or if your router is advanced enough and you use it as your DNS (domain name server) you should simply be able to type the browser location as "lasersaur:8081" as shown below and you should see the webcam:
|
|
 |
First Time Wireless Network and Root Password Setup:
For the first time setup, you will need to run a RJ45 LAN cable from your router to the input of our LAN on the Lasersaur server, this will allow us the ability for the first time to configure it and setup to use the wireless network. After the wireless network credentials are given you'll be able to disconnect the LAN cable and it should then use the wifi network .
When you receive our Wifi/LAN Lasersaur server for the first time it will have a username of "las" and default user and root password of "K40remote". It's not recommended that you leave the remote password as factory default, our first time installer will help you change this password. JUST REMEMBER WHEN CHANGING TO WRITE THIS DOWN SOMEWHERE YOU WON'T LOSE IT! We cannot help you recover it without sending the item back, that will be additional fees for our time and shipping if we have to help you recover this password. Also the Lasersaur server doesn't know how to access your local wifi network. We'll need to set this up to your SSID and network credentials. To do both operations, there is as an installer CD-ROM that comes with the Lasersaur server you'll need to run after connecting to your router by a physical LAN RJ45 cable. If in windows run the setup.exe installer, it will ask you the root password presently, the next field will ask you what new root password you will want to use (skip if no change desired), use "K40remote" for first time password otherwise whatever was the last used password you set. Enter in the next field the SSID name of your wifi wireless network you want the server to use. Then in the following field the password for this wifi network. When you click the submit button the information should be updated. If successfull, disconnecting the LAN cable, repowering the device, and opening up a firefox browser and testing by "lasersaur:8081" should bring up the desired result of being able to communicate to a USB camera if connected. Otherwise you'll need to test by moving the Lasaersaur server to the Lasaursaur Shield and connecting using a USB cable. Copy the setup.sh and setup.param file to a local directory. Then seeing if you can access remotely through a browser it control for Lasersaur. For linux the first time setup is ran by running the script setup.sh with the command > "sh setup.sh or executing the setup.sh it self, but first make sure to change the setup.param for all the text fields of "currentrootpassword", "newrootpassword", SSIDname, and SSID password. After running the shell script, be sure to delete the setup.params file on your local computer.
|
|
First Time Hardware Installation:
For the first time installation you have already acquainted yourself with the wiring and cable connections in the beginning of this installation/purchase manual. We'll quickly show how to access the control bay and then following pictures how to attach the server to the vents as showed within the control hatch.
|
|
 |
From the inside bay hatch we fasten the other side of standoffs of the Lasersaur server as shown below:
|
|
 |
Obviously inside the same bay we have an already installed USB LaserSaur Shield secured in the opposite side of the vent wall. Our short USB cable running from this LaserShield USB port to our USB port of the Lasaur Server, quickly reshown here. With that we have installed a versatile ability to run your LaserShield through any computer on your wifi network!
|
|
 |